In this lesson, we are going to download and install SQL Developer. If you already know how to install it or you already have it installed, please skip this lesson.
Click here to get to the official SQL Developer downloads page.
As usual, you have to accept the license agreement.
On the download page, scroll down to find the download links. If you are using a 64 bits version of Windows you can download the installer that includes the Java Development Kit or JDK.
I will show you how to proceed in case you are running a 32 bits Windows. So, click on “download“ and log in with your Oracle account, and click on Save to start the download.
When it finishes, go back to the previous page (i.e. the SQL Developer downloads page) to download the JDK.
The download link will be next to the installation notes, as shown in the image below.
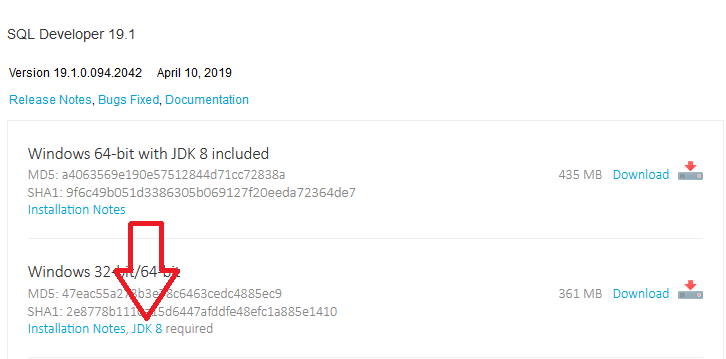
Again, you need to accept the license and click on the appropriate download link depending on your operating system.
Make sure you are downloading the most recent version.
When the download finishes, the first thing you need to install is the JDK, so go ahead and run the installer. If you already have the JDK version 8 or higher installed, you can omit this step. Just make sure you have the latest update installed, for your own security.
When the JDK installation finishes, you are ready to install SQL Developer. Actually, SQL Developer doesn’t need to be installed. You just need to extract the zip file you downloaded, so, choose a folder where you want to put SQL developer, and extract the files there.
When the extraction finishes, I would recommend creating a shortcut to the application, so that you can easily run it from the desktop, so open the folder that was created, and create the shortcut.
Running SQL Developer for the first time
Now, go ahead and run it. When it runs for the first time, it will ask for the path where the JDK was installed, so click on the “Browse” button, and navigate to the JDK location.
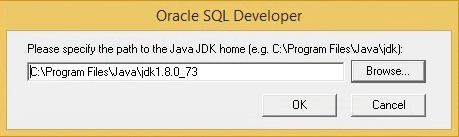
You need to specify the root folder for the JDK and then click on “Ok”.
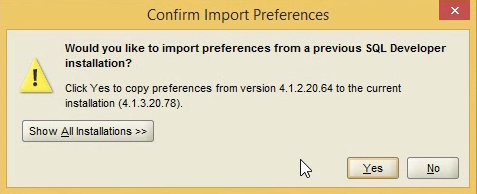
The program will ask if I want to import settings from a previous installation, so, if you don’t have one, just click on “No”, or click “Yes” if you do have a previous installation and you want to import its settings.
You might get another dialog asking you to allow sending usage statistics, so, if you are like me, you will probably want to clear the checkbox and click on “OK”.
![]()
And with this, you have Oracle SQL Developer configured and ready to be used to access your database. Great!
Now go to the next lecture to learn how to use this great tool.
See you!