In this lesson, we are going to download and install the database system, which in our case will be Oracle Express Edition 18c.
If you already know how to install it or you already have it installed, please skip this lesson. Just keep in mind that the course is based on Oracle 18c, but an Oracle database version 12.2 would work correctly as well. If you have 12.1 or below, I would recommend installing a newer version, as there are some features taught in the course that would not work on older versions.
The Oracle database can be installed on Windows or Linux only, so if you are using a Mac, you have basically two options: You can install the database on a virtual machine, or you can take the course without installing anything, using Live SQL, as described in the previous lesson.
Note: At the time of writing this, Oracle Express Edition 18c is not supported on Windows 10 Home Edition, and the installer will likely fail on that operating system, so, if that is what you have, you will have to decide between 2 options mentioned in the previous paragraph as well.
If you want to install the database on a virtual machine, please continue to the next lecture, where you will find the instructions on how to set up your database on a pre-configured virtual machine.
Here I will show you the installation process on Windows, but doing it on Linux is also an easy task.
To begin, click here to get to the official Oracle XE downloads page.
Once you get to the site, the first thing you need to do is to accept the license agreement, and then you need to select the appropriate download for your operating system, which can be Windows 64 bits or Linux.
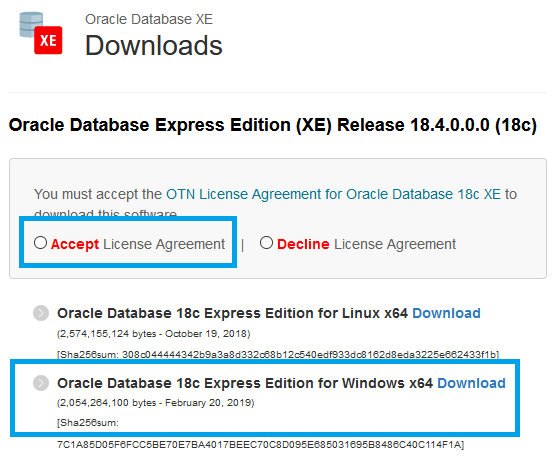
On the download page, if you already have an Oracle account, just enter your e-mail and password and click the sign in button. If you don’t have an account, click on the “Create account” button to create one. You just need to fill in the requested details, which will take you just a few minutes.
When prompted make sure to save the download, and wait for it to complete.
It is a relatively big download, so it can take some time, depending on your connection speed.
Please stop reading now, and continue when the download finishes.
Now that the download has finished, go to your downloads folder, extract the zip file, and run the installer.
There’s an MSI installer there, but we will be using the SETUP.exe file that is also included.
BUT, if you have a previous version of the database installed, you need to uninstall it before running the installer.
In my case, I had an Oracle Express edition version 11g previously installed, so, I had to uninstall it first. To do that I had to go to the Control Panel, then search for the option to “Uninstall a program”, and there I located the Oracle Database Express 11g software, and double clicked on it to uninstall it.
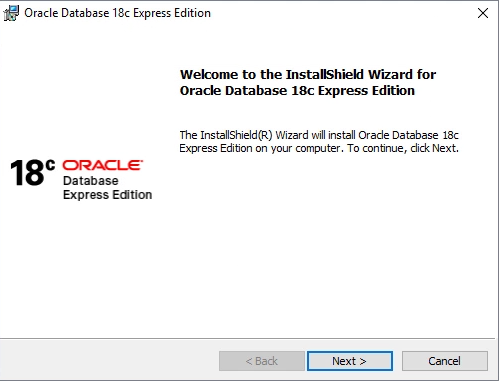
And now… We can run the 18c installer!
Here just click on “Next” to start, and when prompted, review the license agreement if you want to, and accept it.
In the following dialog, you can select the destination folder.
If you want to use the default location, just click on “Next”, but in my case, I changed it because I wanted it installed on my D drive instead.
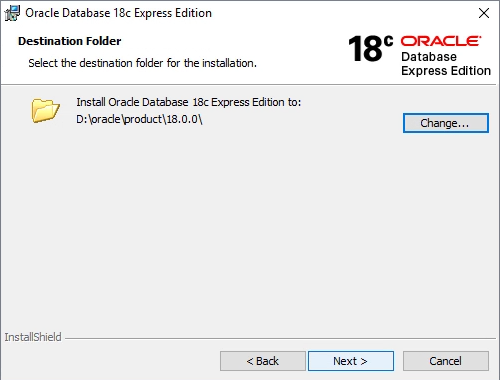
If you change the path and the new one doesn’t exist, the installer will create it for you.
Click next to continue.
In the following dialog, you need to define a password for the sys, system and PDBADMIN accounts.
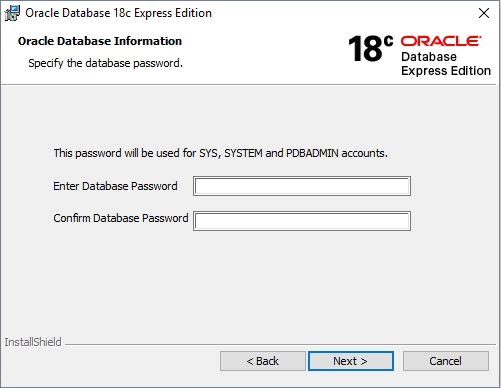
You will need this password to create other user accounts and some other important things, so make sure to choose one that you won’t forget.
After entering and confirming your password, click next, and in the summary dialog, click “Install” to begin the installation.
When the installation finishes, a dialog will display some information that will be useful when connecting to the database later.
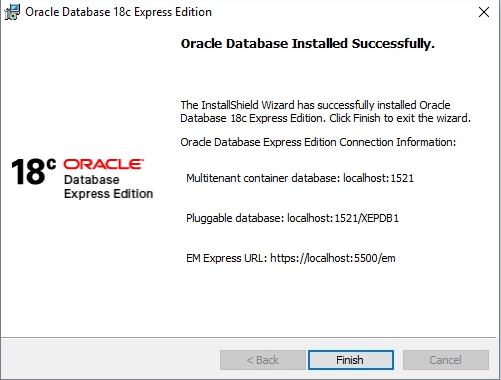
It tells you the port of the multitenant container database, the name of the pluggable database, and the URL to access enterprise manager.
I would recommend saving a screenshot of this dialog, just in case you need this information later.
This “multitenant” and “pluggable” database terminology might not make sense to you by now, but it will all make sense a little later, because there is a lesson that explains the multitenant architecture, which you will find in the next section.
Ok, now just click on finish to exit the installer.
Oracle Enterprise Manager Express
And now, just for the sake of completeness, I will show you how to access Enterprise Manager.
This is a tool that is used for database administration, and we will not use it at all during the course, because from now on, we will be completely focused on the SQL language, from the development point of view.
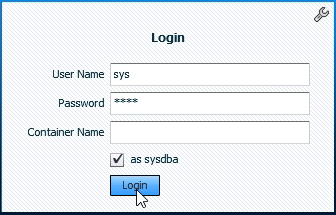
Enterprise Manager (EM) is a web application, so you have to enter the URL in your preferred browser’s address box.
If you didn’t change anything, the URL should be: https://localhost:5500/em
To login to EM, you have to use the SYS account, whose password was defined during the installation process.
By now leave the container field empty, so that you connect to the root container, and select the checkbox option to connect “as sysdba”.
Again, everything about containers and root is explained in the next section, so even if it doesn’t make much sense by now, it will make complete sense later, and you will say “ah, that is what I was connecting to when I used enterprise manager”.
If it gives you a critical error about failing to parse the data returned by the server, you will probably have to use a different browser, as, according to my tests, this application is only compatible with Chrome and Internet Explorer.
The browser will probably tell you that the site is not secure, because it uses a self-signed certificate, but you can go ahead and click on the “details” or “more information” link, from which you can then decide to accept the risk and navigate to the site.
And you will need to allow the use of Flash as well.
After logging in, you will be presented with some information about your database, which includes data about CPU, sessions, memory, and storage.
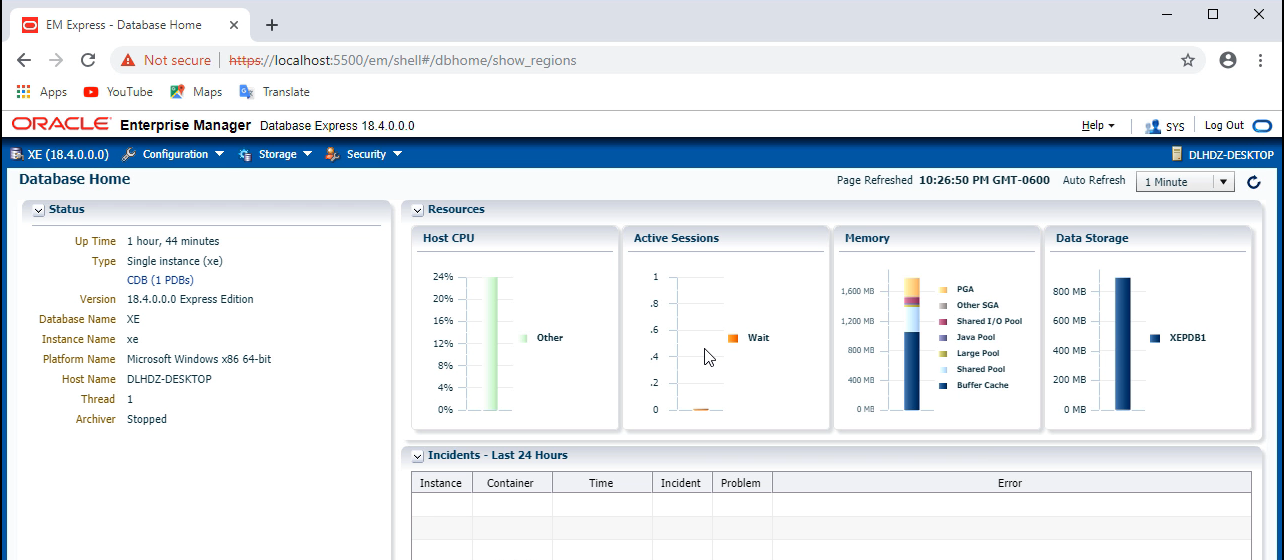
On the left-hand side panel, It also tells you that you have one PDB, or pluggable database, and if you click on its name, it takes you to the list of containers, where you will see that the pluggable database’s name is XEPDB1.
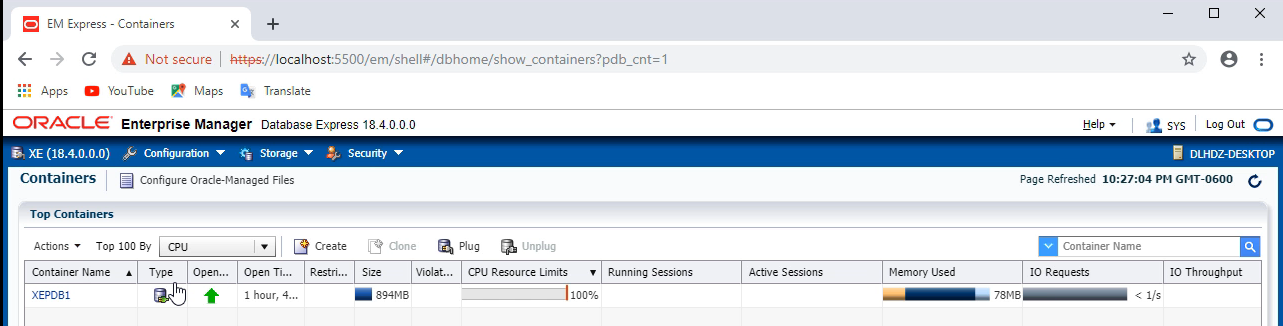
If you click on “XEPDB1”, you will see information specific to that PDB.
There are also some other options in “Configuration” and some more in “Storage “ and “Security”, in the top menu.
Feel free to take a look at the site and all of the options it has if you want to, but as I mentioned before, we will not use it for the course.
And that’s it!
You now have an Oracle 18c database installed and ready to be used to start learning SQL, which is great!
Let’s continue to the next lesson.
I’ll see you there.