I included this lesson just in case you have not taken my course about SQL Developer.
To be honest, I’m still not sure if it was a good idea to create this lesson, because you really SHOULD take that course first if you really want to stand out when working with Oracle databases. It is a FREE course, so there is no reason for not wanting to take it. So, if you have not taken it yet, I encourage you to take it first and come back to this course after that.
Feel free to go! I’m not going anywhere 😉
Okay, if you already took it, please skip this lesson, and if you have not taken it and are not going to take it first, then keep reading this lesson for the very basic knowledge you need about using SQL Developer.
Creating New Connections
Okay, let’s do this!
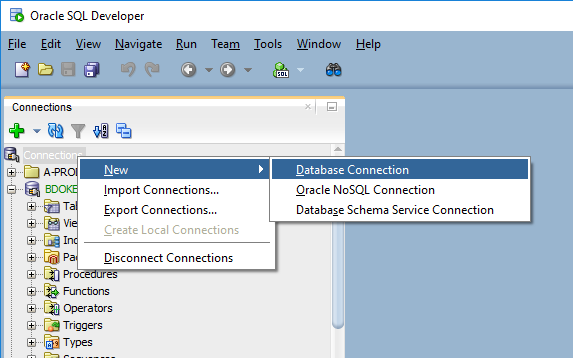
To create a new connection, right click on “Connections”, which is in the panel to the left, and select “New”->”Database Connection”, or just click on the green plus sign icon above it.
This will open a new window, like the one in the image below, in which I already entered the information I will use to create the connection.
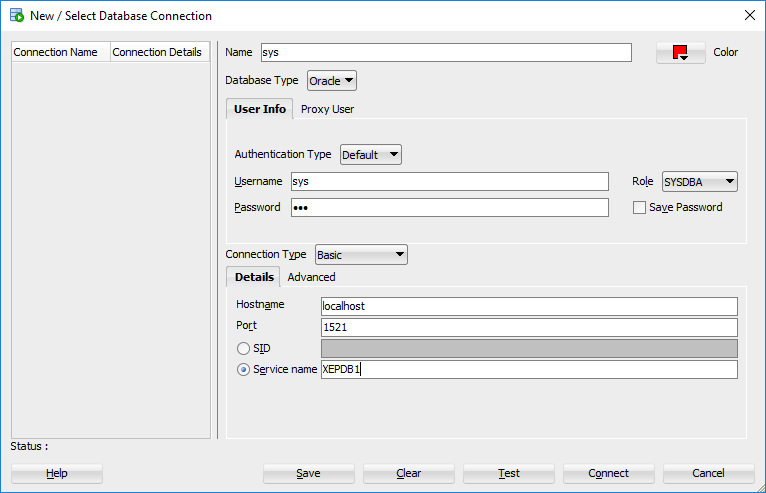
In the new connection window, you have to give the connection a name. In the example of the image above, I called it “sys”, but you can name it however you like. For this example, I used the SYS user as well, which if you just installed your database, is probably the only user you will have at this point.
SQL Developer offers an option to define a color to identify each connection. My recommendation is that you always set a connection color, to be able to differentiate connections visually. I find this feature very useful.
Now, because in the example I used the SYS account, in the “Role” list, I selected SYSDBA, but if you are using a normal user, you don’t need to change it.
If you only have the SYS user by now, that’s OK. We are going to create a normal user in a future lesson.
If you are running your Oracle database on your local computer you can leave “localhost” as the hostname, otherwise, you need to write the name or the IP address of the machine where the database is running.
1521 is the default port of the Oracle listener, so most of the times you won’t need to change that.
And XEPDB1 is the default service name for the pluggable database that is created in the express edition.
SQL Developer will probably have by default selected the “SID” radio button, and will have a value of “xe” in the text box next to it, but if we use that, we will be connecting to the ROOT container, and we don’t want to do that. For this course we want to connect to the pluggable database, so, you have to change it to use a Service Name (the option below SID), and put the name of the pluggable database (PDB) that was automatically created during the installation, which is XEPDB1.
If you are not using an express edition database, you will most likely need to use a different SID or Service Name.
Now you can go ahead and click on the “test” button. If everything is correct, the test will succeed, and you can now save the connection. Otherwise, you will get an error message describing the problem, at the bottom left corner of the window.
The next time you want to connect to the database, you just have double click on the connection, which will open the worksheet, where you can start writing SQL commands.
Keep in mind that every command must end with a semicolon.
Worksheet Basics
At the top left corner of the worksheet, on the toolbar, there is a button to run commands, or you can press CTRL+ENTER. This will execute the command where the writing cursor is positioned. If you want to execute more than one command in one go, or maybe only part of a command, you can select the part or the commands you want to run, and then press CTRL+ENTER.
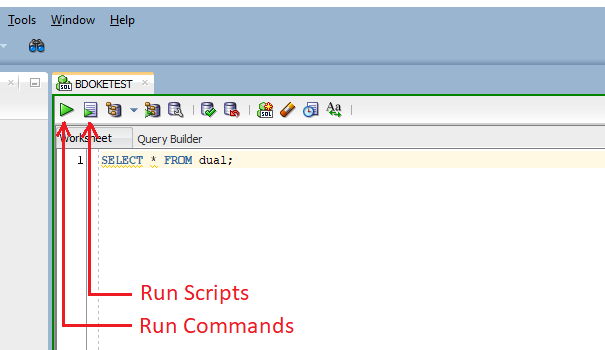
If you want to run all of the commands you have in your worksheet you can just press the F5 key, which is used to run scripts, or press the “Run Script” button on the toolbar.
And if you want to format your code, you just have to select the code you want to format and press CTRL+F7.
Okay, that’s it. This is the minimum knowledge you need, but again, you should not be happy with knowing the minimum.
See you in the next lesson!